Posted 7 years ago
·
Author
Here in this topic, I am sharing what I learned and use when making art that deals with head hair.
This is all that I have learned and I hope this gives you an idea on how you can do hair for DPs.
I also use this technique when creating hair textures too, but that is another topic for a later time. Right Now I am just focusing on making hair for things such as DPs.
These are brush types that I have found to be useful when creating hair instead of one strand at a time. But as always, art is art and you create anything with anything.
•Getting Started•
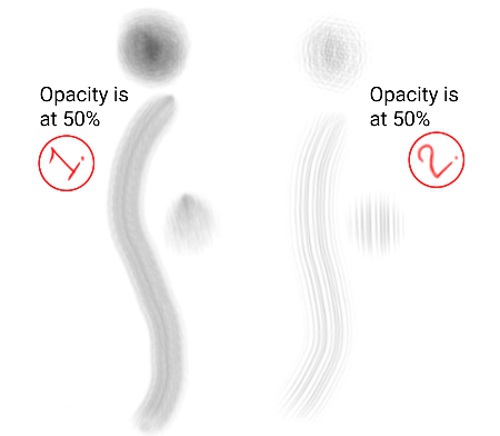
It is important to find brushes that you find works for you and that will make your creativity come to life. When I create any type of head hair, these brushes are what I look for when using any type of program. #1. Shown below is the main brush I use every time when making hair. #2. is not always used but can be in a similar way as #1, but more often than not, I don't use this brush for anything other than using it on the outside of hair to give the illusion of individual hairs that are separated from the main section of hair, whether it's on the edges of a full head of hair, or on the inside where it surrounds the face and chest depending on how long you draw it.
•Sketching Your Idea Out•
Once you find the brush you are going to work with, it is now time to sketch out the hair. If you are drawing out big sections, it is always easier to use a larger size when creating hair. You can always add in detail later before the fully finished product.
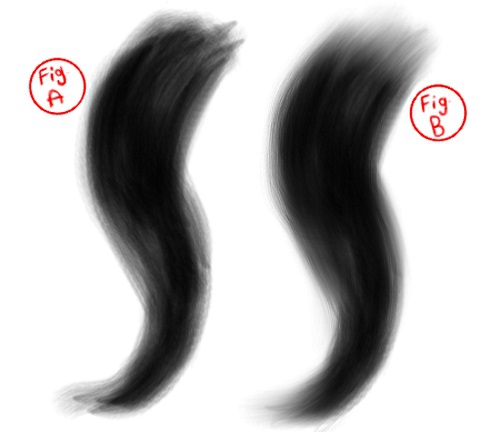
When sketching out the first step of your hair. You should start with a base color. That base color is going to be the darkest color you choose. Down below in Figure.A. I used the #1 brush that is my main brush. After fully sketching out the hair in sweeping motions, I got the shape I want. You don't have to do this particular shape, it is just the one I picked. I will go over things like straight, wavy, and curly hair in another topic.
One thing to remember when creating head hair or fur if you will. Hair tends to naturally stick together in sections due to the natural oils found in hair, and from the scaly texture of the shafts of the hair.
Down below In Figure.B. I took a smudging type tool and smudged out the bulky harsh lines found around the hair.
•Blocking in and Refining your Hair•
After sketching out your hair and refined the edges, You wanna block in your sketch in the middle to give it more fullness, unless you're going for a thinning effect.
Now that your sketch is filled in, its time to move on to the highlighting part. Using a shade lighter than your base, this is the first thing you are going to lay down. When highlighting hair, it can fall in 2 different ways upon the hair.
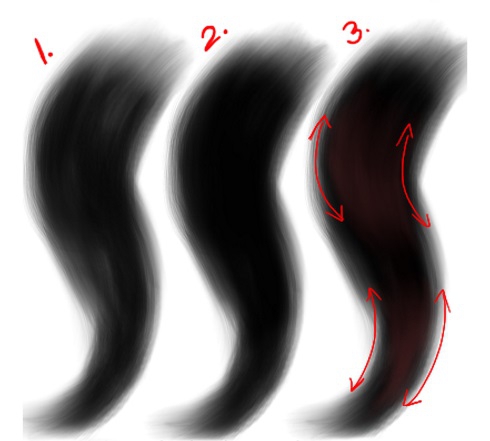
In the #3. sketch, the arrows show which way the highlight will show up. The highlight on the top will depict a highlight that shows up in the hair if you bend it inwards. The bottom highlight shows up when the hair is bent outward.Giving this flat sketch dimension. Highlights can be placed to give an illusion that the hair is 3D, and it also gives it a sense of texture as well.
•Giving Hair Dimension•
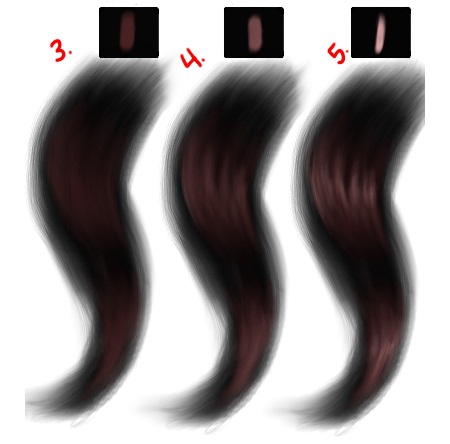
In the following is basically a repeated process. The only difference is every time you lay down a new shade lighter than the last, your brush gets smaller and you ar placing it in the middle of each section. It is best using your brush, not at full opacity mode. You can but you would just have to blend out some harsh lines is all. You can choose to do this as many times as you like, but I only use this method 3 times. With each pass, gradually building it up the in separated strokes will give the hair texture to it.
•Finnal and Optional•
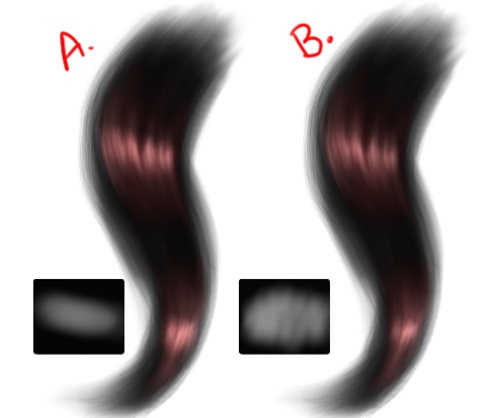
This step is completely optional to you, but this is what I do to finish off my hair. Depending on how shiny and glossy you want your hair, I chose to take an airbrush tool with its opacity turned pretty low, I'm sure it's lower than 50%, but it is easier to build up than to go overboard. Back to using that airbrush tool, there are 2 ways you can go about with this. On a separate layer set to a glow blend mode. You can use a sweep motion to add this highlight shown in A.. Or you can do what I prefer to do is apply the airbrush in a zigzag pattern shown in B.
They look almost identical, but the zigzag pattern gives it a more natural realistic "organic" (if you will) feel overall.
These are the techniques that I use currently. I also used this way of creating hair when I also created the "sexy emojis" with the girls' hair.
And as always, art is art. Your style is your own. Have fun with it and always practice! I hope this helps anyone who gives it a go!
This is all that I have learned and I hope this gives you an idea on how you can do hair for DPs.
I also use this technique when creating hair textures too, but that is another topic for a later time. Right Now I am just focusing on making hair for things such as DPs.
These are brush types that I have found to be useful when creating hair instead of one strand at a time. But as always, art is art and you create anything with anything.
•Getting Started•
It is important to find brushes that you find works for you and that will make your creativity come to life. When I create any type of head hair, these brushes are what I look for when using any type of program. #1. Shown below is the main brush I use every time when making hair. #2. is not always used but can be in a similar way as #1, but more often than not, I don't use this brush for anything other than using it on the outside of hair to give the illusion of individual hairs that are separated from the main section of hair, whether it's on the edges of a full head of hair, or on the inside where it surrounds the face and chest depending on how long you draw it.

•Sketching Your Idea Out•
Once you find the brush you are going to work with, it is now time to sketch out the hair. If you are drawing out big sections, it is always easier to use a larger size when creating hair. You can always add in detail later before the fully finished product.
When sketching out the first step of your hair. You should start with a base color. That base color is going to be the darkest color you choose. Down below in Figure.A. I used the #1 brush that is my main brush. After fully sketching out the hair in sweeping motions, I got the shape I want. You don't have to do this particular shape, it is just the one I picked. I will go over things like straight, wavy, and curly hair in another topic.
One thing to remember when creating head hair or fur if you will. Hair tends to naturally stick together in sections due to the natural oils found in hair, and from the scaly texture of the shafts of the hair.
Down below In Figure.B. I took a smudging type tool and smudged out the bulky harsh lines found around the hair.

•Blocking in and Refining your Hair•
After sketching out your hair and refined the edges, You wanna block in your sketch in the middle to give it more fullness, unless you're going for a thinning effect.
Now that your sketch is filled in, its time to move on to the highlighting part. Using a shade lighter than your base, this is the first thing you are going to lay down. When highlighting hair, it can fall in 2 different ways upon the hair.
In the #3. sketch, the arrows show which way the highlight will show up. The highlight on the top will depict a highlight that shows up in the hair if you bend it inwards. The bottom highlight shows up when the hair is bent outward.Giving this flat sketch dimension. Highlights can be placed to give an illusion that the hair is 3D, and it also gives it a sense of texture as well.

•Giving Hair Dimension•
In the following is basically a repeated process. The only difference is every time you lay down a new shade lighter than the last, your brush gets smaller and you ar placing it in the middle of each section. It is best using your brush, not at full opacity mode. You can but you would just have to blend out some harsh lines is all. You can choose to do this as many times as you like, but I only use this method 3 times. With each pass, gradually building it up the in separated strokes will give the hair texture to it.

•Finnal and Optional•
This step is completely optional to you, but this is what I do to finish off my hair. Depending on how shiny and glossy you want your hair, I chose to take an airbrush tool with its opacity turned pretty low, I'm sure it's lower than 50%, but it is easier to build up than to go overboard. Back to using that airbrush tool, there are 2 ways you can go about with this. On a separate layer set to a glow blend mode. You can use a sweep motion to add this highlight shown in A.. Or you can do what I prefer to do is apply the airbrush in a zigzag pattern shown in B.
They look almost identical, but the zigzag pattern gives it a more natural realistic "organic" (if you will) feel overall.

These are the techniques that I use currently. I also used this way of creating hair when I also created the "sexy emojis" with the girls' hair.
And as always, art is art. Your style is your own. Have fun with it and always practice! I hope this helps anyone who gives it a go!


 Don't laugh..just don't laugh lol.
