Posted 7 years ago
·
Author
3 Versatile Text Effects
These text effects are perfect for collars, clubs, posters, wall hangings, icons, banners and many more! I personally have used them to create all of the things named, and as you make them you will find that you can edit it much more to personalize it as I have.
Indent Text
Steps:
☑ 7 Steps
Difficulty:
☑ Very Easy
Important Tools:
☑ Blending Options
Step 1 - Setting up the Text
First create a new document. I created a 328x85px document and filled ( Edit > Fill ) the background with color Hex #4e4e4e.
Using the Horizontal Type Tool, write some text. The text I created uses the font "Ariel Black" at a size of 72pt and with a color of white ( Hex #ffffff ).

Change the Blending Mode of the layer to "multiply". Your text should disappear. This is fine.
Step 2 - Inner Shadow
All this style of text needs in order for completion is a Layer Style. To create the layer style, open the Blending Options of the text layer. Do this by right clicking the layer on the Layer Palette and clicking on "Blending Options".
Over the next 5 steps, we will be adding 5 Blending Options: Inner Shadow, Outer Glow, Inner Glow, Gradient Overlay, and Stroke.
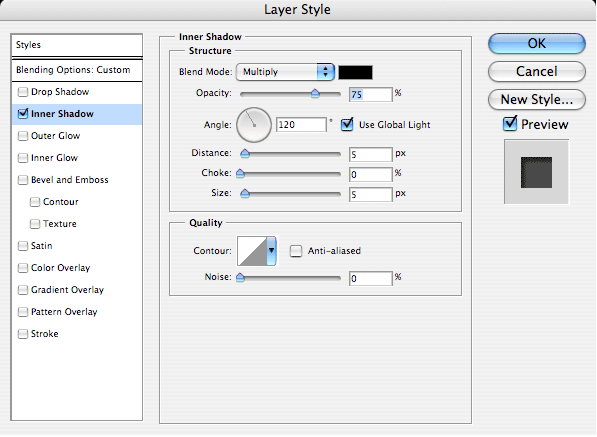
First we will add the Inner Shadow. Click on the image to the left and use the values shown in your own Layer Styles window.
We use the Inner Shadow to add the illusion of an indentation. Basically, we are creating the "hole" of the text.

Step 3 - Outer Glow
Now add an Outer Glow. Click on the image to the right and use the values shown in your own Layer Styles window.
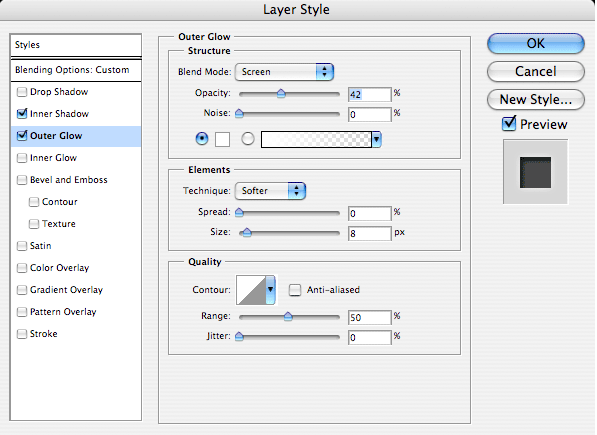
The Outer Glow is used in this case to make the outer edge of the text look as if it is lifting up. This helps create contrast between the hole and the surrounding metal.

Step 4 - Inner Glow
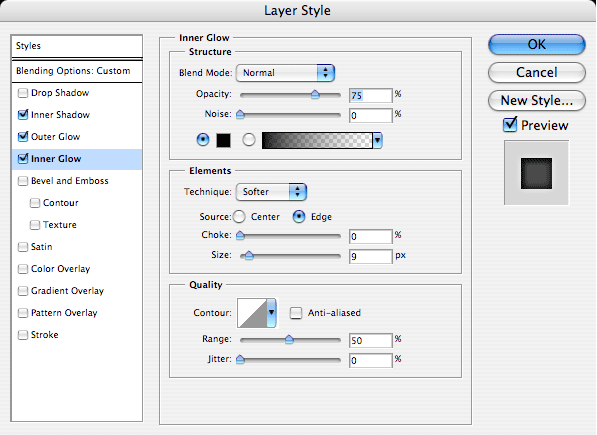
Add a Inner Glow. Click on the image to the left and use the values shown in your own Layer Styles window.
We are using the Inner Glow not so much as a glow of light, but rather more like a heavy shadow.
Step 5 - Gradient Overlay
Apply a Gradient Overlay. Click on the image to the right and use the values shown in your own Layer Styles window.
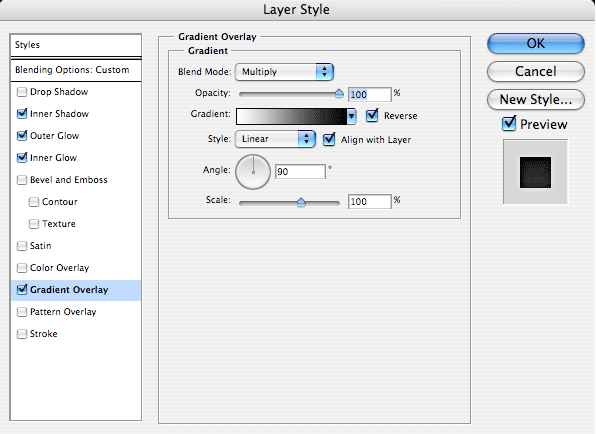
We add this Gradient Overlay in order to make the shadow in the hole as durastic as possible without being overdone.

Step 6 - Stroke
Finally, add a Stroke. Click on the image to the left and use the values shown in your own Layer Styles window.
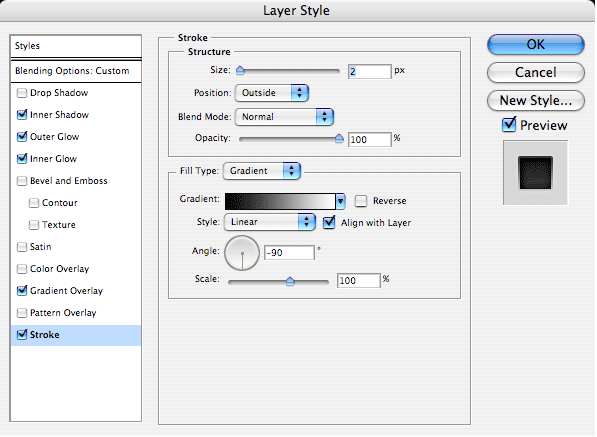
This Stroke is special because it is a gradient. This creates the illusion of a beveled edge.

Step 7 - Layer Style
Now you want to save this Layer Style so you can use it later whenever you want. Without closing your Blending Options, click on the "New Style..." button. Name your style "Indent Text" and Click "OK".
You should now be able to click on the style in the Styles Window ( Window > Styles ) to apply it to any layer you want. It works best on text layers but it will also work for anything else!

----------------------------------------------------------------------------------------------------
Shiny Text
Steps:
☑4 Steps
Difficulty:
☑Easy
Important Tools:
☑Horizontal Type Tool
☑Blending Options
☑Polygon Lasso Tool
☑Contract
Step 1 - Setting up the Document
Create a new image any size (we used 340x100px) with a white background. Using the Type Tool, write a word or two in Black ( Hex #000000). I wrote "N-sane Art" using the font Impact size 8pt.

Step 2 - Adding the Bevel
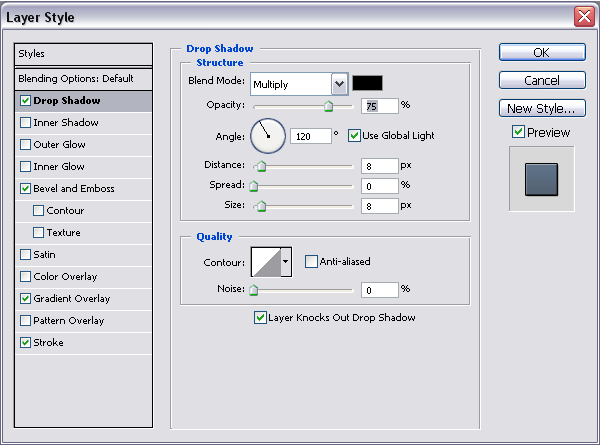
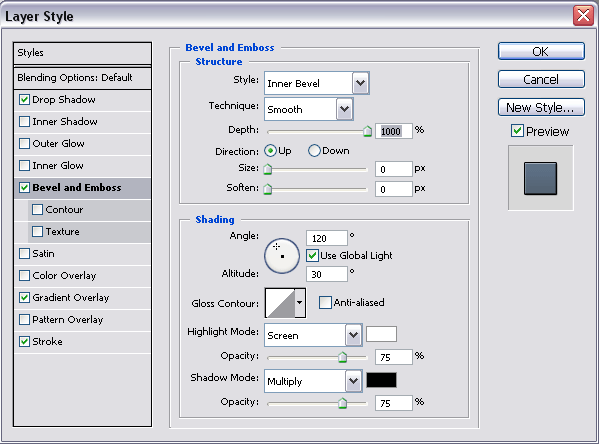
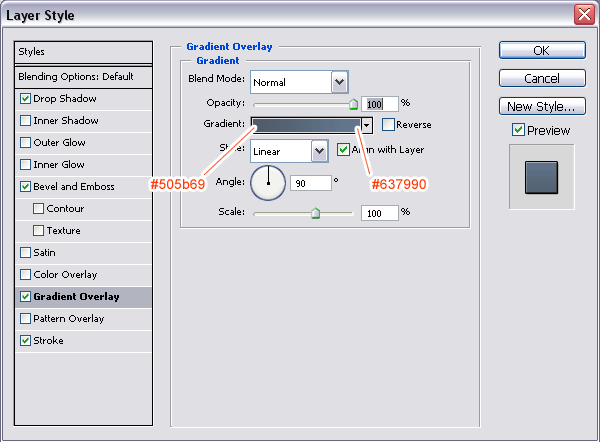
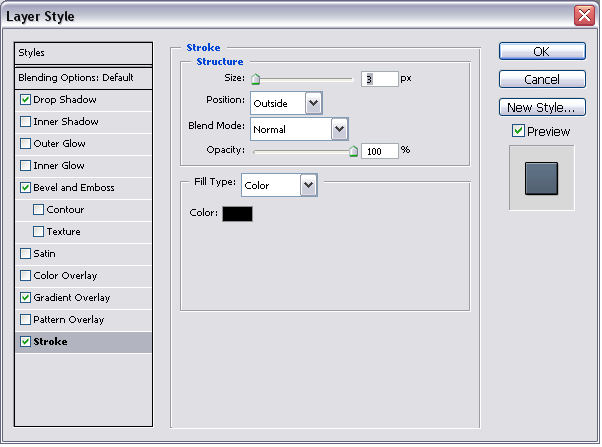
Right-click on the text layer in the Layer Palette and click on "Blending Options..." Use the settings in the images below.
Step 3 - Creating the Shine
Now that your text has a nice effect on it, it is time to add the shine. Right-click the thumbnail of the text layer on the Layer Palette and choose "Select Layer Transparency".

While pressing Alt, use the Polygon Lasso Tool to de-select the bottom half of the selection.

Step 4 - Final Touches
Without de-selecting, create a new layer. Contract the selection ( Select > Modify > Contract ) by 3 pixels. Fill ( Edit > Fill ) in the selection with White ( Hex #FFFFFF ).

Lower the opacity of the layer with the shine on it to 45%.
You can change the background to anything you want and the shiny text should still look good!

----------------------------------------------------------------------------------------------------
Plastic Text
Steps:
☑5 Steps
Difficulty:
☑Very Easy
Important Tools:
☑Blending Options
Step 1 - Setting up the Text
First create a new document. I created a 328x85px document and filled ( Edit > Fill ) the background with color Hex #4e4e4e.
Using the Horizontal Type Tool, write some text. The text I created uses the font "Ariel Black" at a size of 72pt and with a color of white ( Hex #ffffff ).

Step 2 - Drop Shadow
All this style of text needs in order for completion is a Layer Style. To create the layer style, open the Blending Options of the text layer. Do this by right clicking the layer on the Layer Palette and clicking on "Blending Options".
Over the next 3 steps, we will be adding 3 Blending Options: Drop Shadow, Bevel and Emboss, and Gradient Overlay.
[img]https://i.gyazo.com/6a73e22a4bfdddaa3bfb2b972997cbd1.png[/img
First we will add the Drop Shadow. Click on the image to the left and use the values shown in your own Layer Styles window.
I used the Drop Shadow to create the illusion that the text is not quite on the background and is instead floating above it. It adds depth to the text without actually manipulating the text itself.

Step 3 - Bevel and Emboss
Now add a Bevel and Emboss . Click on the image to the right and use the values shown in your own Layer Styles window.
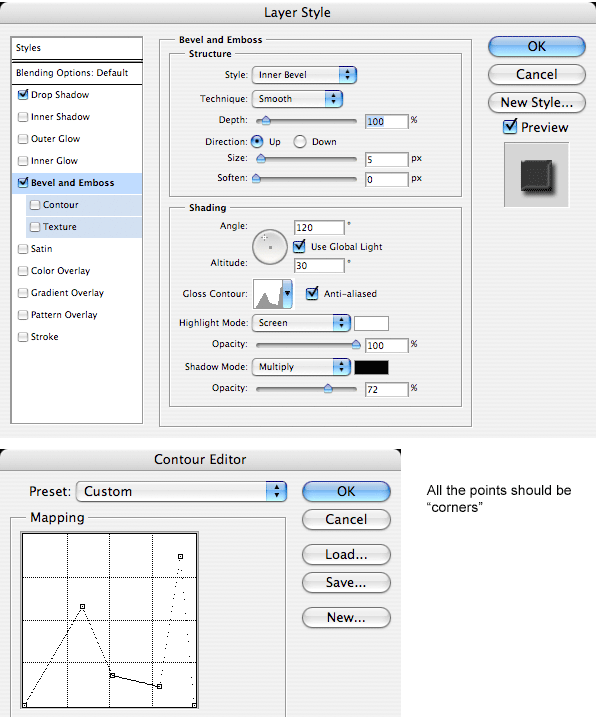
Be sure to create a new custom Gloss Countour. Do this by clicking on the arrow on the Glass Contour box, then clicking on the little arrow on the window that pops up. Make a contour similar to the one in the image to the right.
The Bevel and Emboss makes the illusion of 3-dimensions by adding shine and shadows to the text. We changed the Glass Contour in order to make the shine appear not right on the edge of the text but somewhat inside.

Step 4 - Gradient Overlay
Finally, add a Gradient Overlay . Click on the image to the left and use the values shown in your own Layer Styles window.
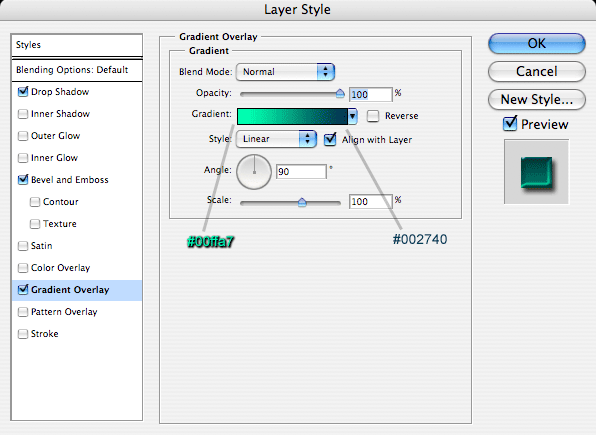
The Gradient Overlay in this case is the coloring of the text. We made the bottom brighter than the top in order to enhance the plastic effect.

Step 5 - Layer Style
Now you want to save this Layer Style so you can use it later whenever you want. Without closing your Blending Options, click on the "New Style..." button. Name your style "Plastic Text" and Click "OK".
You should now be able to click on the style in the Styles Window ( Window > Styles ) to apply it to any layer you want. It works best on text layers but it will also work for anything else!

---------------------------------------------------------------------------------------------
☑Hints:
Playing with the colors and options, will give you tons of new styles to save, the more you play the move you can create and save.
These text effects are perfect for collars, clubs, posters, wall hangings, icons, banners and many more! I personally have used them to create all of the things named, and as you make them you will find that you can edit it much more to personalize it as I have.
Indent Text
Steps:
☑ 7 Steps
Difficulty:
☑ Very Easy
Important Tools:
☑ Blending Options
Step 1 - Setting up the Text
First create a new document. I created a 328x85px document and filled ( Edit > Fill ) the background with color Hex #4e4e4e.
Using the Horizontal Type Tool, write some text. The text I created uses the font "Ariel Black" at a size of 72pt and with a color of white ( Hex #ffffff ).

Change the Blending Mode of the layer to "multiply". Your text should disappear. This is fine.
Step 2 - Inner Shadow
All this style of text needs in order for completion is a Layer Style. To create the layer style, open the Blending Options of the text layer. Do this by right clicking the layer on the Layer Palette and clicking on "Blending Options".
Over the next 5 steps, we will be adding 5 Blending Options: Inner Shadow, Outer Glow, Inner Glow, Gradient Overlay, and Stroke.

First we will add the Inner Shadow. Click on the image to the left and use the values shown in your own Layer Styles window.
We use the Inner Shadow to add the illusion of an indentation. Basically, we are creating the "hole" of the text.

Step 3 - Outer Glow
Now add an Outer Glow. Click on the image to the right and use the values shown in your own Layer Styles window.

The Outer Glow is used in this case to make the outer edge of the text look as if it is lifting up. This helps create contrast between the hole and the surrounding metal.

Step 4 - Inner Glow
Add a Inner Glow. Click on the image to the left and use the values shown in your own Layer Styles window.
We are using the Inner Glow not so much as a glow of light, but rather more like a heavy shadow.

Step 5 - Gradient Overlay
Apply a Gradient Overlay. Click on the image to the right and use the values shown in your own Layer Styles window.

We add this Gradient Overlay in order to make the shadow in the hole as durastic as possible without being overdone.

Step 6 - Stroke
Finally, add a Stroke. Click on the image to the left and use the values shown in your own Layer Styles window.

This Stroke is special because it is a gradient. This creates the illusion of a beveled edge.

Step 7 - Layer Style
Now you want to save this Layer Style so you can use it later whenever you want. Without closing your Blending Options, click on the "New Style..." button. Name your style "Indent Text" and Click "OK".
You should now be able to click on the style in the Styles Window ( Window > Styles ) to apply it to any layer you want. It works best on text layers but it will also work for anything else!

----------------------------------------------------------------------------------------------------
Shiny Text
Steps:
☑4 Steps
Difficulty:
☑Easy
Important Tools:
☑Horizontal Type Tool
☑Blending Options
☑Polygon Lasso Tool
☑Contract
Step 1 - Setting up the Document
Create a new image any size (we used 340x100px) with a white background. Using the Type Tool, write a word or two in Black ( Hex #000000). I wrote "N-sane Art" using the font Impact size 8pt.

Step 2 - Adding the Bevel
Right-click on the text layer in the Layer Palette and click on "Blending Options..." Use the settings in the images below.


Step 3 - Creating the Shine
Now that your text has a nice effect on it, it is time to add the shine. Right-click the thumbnail of the text layer on the Layer Palette and choose "Select Layer Transparency".

While pressing Alt, use the Polygon Lasso Tool to de-select the bottom half of the selection.

Step 4 - Final Touches
Without de-selecting, create a new layer. Contract the selection ( Select > Modify > Contract ) by 3 pixels. Fill ( Edit > Fill ) in the selection with White ( Hex #FFFFFF ).

Lower the opacity of the layer with the shine on it to 45%.
You can change the background to anything you want and the shiny text should still look good!

----------------------------------------------------------------------------------------------------
Plastic Text
Steps:
☑5 Steps
Difficulty:
☑Very Easy
Important Tools:
☑Blending Options
Step 1 - Setting up the Text
First create a new document. I created a 328x85px document and filled ( Edit > Fill ) the background with color Hex #4e4e4e.
Using the Horizontal Type Tool, write some text. The text I created uses the font "Ariel Black" at a size of 72pt and with a color of white ( Hex #ffffff ).

Step 2 - Drop Shadow
All this style of text needs in order for completion is a Layer Style. To create the layer style, open the Blending Options of the text layer. Do this by right clicking the layer on the Layer Palette and clicking on "Blending Options".
Over the next 3 steps, we will be adding 3 Blending Options: Drop Shadow, Bevel and Emboss, and Gradient Overlay.
[img]https://i.gyazo.com/6a73e22a4bfdddaa3bfb2b972997cbd1.png[/img
First we will add the Drop Shadow. Click on the image to the left and use the values shown in your own Layer Styles window.
I used the Drop Shadow to create the illusion that the text is not quite on the background and is instead floating above it. It adds depth to the text without actually manipulating the text itself.

Step 3 - Bevel and Emboss
Now add a Bevel and Emboss . Click on the image to the right and use the values shown in your own Layer Styles window.

Be sure to create a new custom Gloss Countour. Do this by clicking on the arrow on the Glass Contour box, then clicking on the little arrow on the window that pops up. Make a contour similar to the one in the image to the right.
The Bevel and Emboss makes the illusion of 3-dimensions by adding shine and shadows to the text. We changed the Glass Contour in order to make the shine appear not right on the edge of the text but somewhat inside.

Step 4 - Gradient Overlay
Finally, add a Gradient Overlay . Click on the image to the left and use the values shown in your own Layer Styles window.

The Gradient Overlay in this case is the coloring of the text. We made the bottom brighter than the top in order to enhance the plastic effect.

Step 5 - Layer Style
Now you want to save this Layer Style so you can use it later whenever you want. Without closing your Blending Options, click on the "New Style..." button. Name your style "Plastic Text" and Click "OK".
You should now be able to click on the style in the Styles Window ( Window > Styles ) to apply it to any layer you want. It works best on text layers but it will also work for anything else!

---------------------------------------------------------------------------------------------
☑Hints:
Playing with the colors and options, will give you tons of new styles to save, the more you play the move you can create and save.

 thanks for the tips tho
 <--- thats ur rewards

 )
) here is a ready made psd for the plastic text effect. Just double click the text layer and change the text to whatever you want.